Modular vertical growing tower.
A compact, three-tier, nine-cup tower with removable gravity distribution decks, keyed stacking sockets, a hose-guide cap and an openly draining foot.
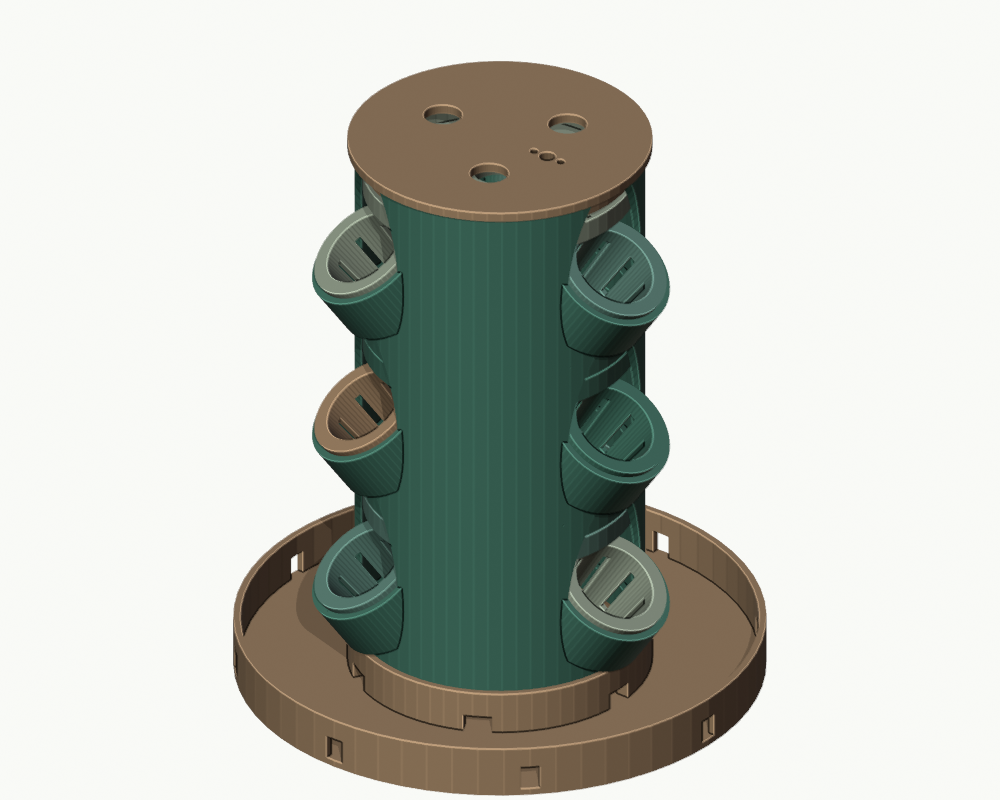
INTERACTIVE 3D PREVIEW
See it from every angle.
Loading 3D preview…
Drag to rotate · Scroll to zoomPLANT WORKSHOP / PROTOTYPE
Make and assemble.
All dimensions are in millimeters. These designs have passed digital mesh checks but have not been physically printed or tested. Check fit, water resistance, and load capacity for your setup.
Parts to print
- base × 1220 mm diameter x 22 mm; drains sideways into a required bought collection tub.
- tier × 3One 85 mm high tier per level; keyed neck gives 75 mm assembled stack pitch; 3 angled cup sockets per tier.
- cup × 948 mm rim x 39 mm high; tapered slotted basket; print upright.
- rain deck × 3113.2 mm diameter x 9 mm; fit one deck in every tier; 3 drip holes and central overflow.
- top cover × 1126 mm diameter x 12 mm print; turn over for installation; 6.8 mm tubing guide hole.
Additional components
- A stable bought collection tub/reservoir with a usable flat bottom at least 240 x 240 mm, larger than the 220 mm tower base; keep overflow contained during trials.
- A small adjustable low-voltage pump with manufacturer-rated tubing, an accessible shutoff/flow-control valve, and a supply line with nominal 6 mm outside diameter where it passes through the cap. Match the pump, tubing and connectors; none are included.
- A nonprinted support or tether for the tower, attached to a stable frame, particularly before adding plants or using all three tiers. The printed stack is not load-rated.
- Nine small rooting plugs or suitable net-cup growing media; the cups are approximately 29-35 mm clear inside.
- A small zip tie through the two 3.4 mm holes beside the offset top feed hole to retain the feed tube.
Assembly
- Place the draining foot inside a stable collection tub. Keep every outer drainage window clear, and position the pump so roots cannot touch its inlet.
- Insert the first tier neck into the central base socket. Align the neck key to the socket notch; the tier shoulder rests on the socket at z=21 mm.
- Lower a rain deck into the tier onto its three ledges at local z=65 mm. Its centre overflow faces upward. Rotate the three 3.6 mm drip holes so that each points toward a cup socket at 0, 120 and 240 degrees.
- Insert three tapered cups into the angled sockets. Their bevels nest in the flared sockets and their flanges sit above the socket faces. Check that cups do not touch the rain deck.
- Repeat deck, cup and keyed tier installation for up to three tiers. Each added tier raises the assembly by 75 mm. Do not omit the rain decks: they catch the upper tier drainage and redirect it toward the cups below.
- Turn the top cover over and insert its neck into the top tier. Feed the supply tube through the offset 6.8 mm hole at radius 25 mm so that its end points onto the annular rain deck, clear of the 22 mm central overflow. Leave enough slack to remove the cover. Secure the tube with a small zip tie.
- With no plants and only plain water, start at the lowest pump setting. Confirm that each drip hole delivers into its cup, each cup drains back into the central chamber, the base returns water freely to the tub, and the rain decks do not flood.
- Increase flow only within the observed drainage capacity. The decks have central overflow openings, but overflow capacity is not a pump rating. Adjust or stop the pump if water rises toward a rim or escapes a cup.
- Tether the tower to a stable support. Add growing medium and small plants only after successful dry fitting, leak/flow trials and a stability check. Inspect and clean the removable decks and cup slots regularly.
Print notes
- All exported STLs are individual bed-ready parts in millimetres. Suggested trial: PETG, 0.20 mm layers, four or five perimeters, six bottom layers and 25-35% infill. Tune to the material and slicer.
- Print the tier upright on its neck. Use accessible paint-on build-plate supports under the internal deck ledges and angled external cup receivers where needed. Inspect their undersides in the slicer. Remove all supports through the open central bore before assembly; do not leave supports blocking the drain path.
- The base and rain deck print open face up. The top cover prints flat disk face down and must be turned over in assembly. Cups print upright; the bevel beneath each rim limits the abrupt outer overhang.
- Start with one tier, one cup and one rain deck. Verify neck, cup and deck fit before printing the repeated parts.
- The tier neck is 113.4 mm outside diameter in a 114 mm receiving socket, giving 0.3 mm nominal radial clearance. This is a dry nesting fit, not a liquid seal.
Limitations
- PROTOTYPE / NOT PHYSICALLY TESTED. The mesh is not a hydraulic simulation or a load/plant-growth certification.
- This is a short 1-3 tier starter for small plants or cuttings. Three tiers assemble to approximately 250 mm tall with nine cups. It is not a proven full-size growing tower.
- The 220 mm foot is an openly draining support, not a reservoir. Use the required bought collection tub and a suitable separate pump.
- The three rain-deck holes can clog. Inspect before use; the centre overflow provides a bypass but has no validated flow rating.
- The top feed tube must discharge onto the annular rain deck, away from the centre overflow. Directing the tube into the overflow bypasses irrigation.
- Actual plants, wet media and supply tubing change the centre of gravity. The three-tier assembly needs an external tether, and no load capacity is claimed.